Showing posts with label GUI. Show all posts

Saturday, September 3, 2011

PyQt: power of Python, beauty of Qt

Qt is very powerful tool for GUI programming. But programming using Qt C++ is not always easy because of unavailability of libraries and difficulty in coding. But Python is powerful and has abundant list of libraries related to virtually anything. Some operations in Python is very easy to use. But the problem of Python is that, it has no GUI its own as handy. PyGTK (Python and GTK) and PyQt (Python and Qt) are the remedy. Here I am explaining how to start with PyQt.
PyQt has no support from QtCreator yet, but the features of QtDesigner can also be used for the PyQt coding. This tutorial explains how to start PyQt programming if you are already aware of Qt C++ programming. This is not just a 'hello world' program, but the code will do something and make you capable of coding your own programs.
In this example, we are building a simple GUI with three LineEdit bars and a single button. When the button is clicked, the numbers entered in the LineEdit a and b are added and the sum is shown in the third LineEdit.


First of all, make GUI widget in Qt Designer and rename the objects a, b, sum and pushButton as shown in screen-shot below. Also make a custom slot named calc_sum(). Save and quit the Designer program.


Now you can see the user interface file named 'widget.ui' (the filename may vary if you changed the widget name while creating your project. Anyway, the filename with .ui as extension is the file we need). We need to create the curresponding python file for user interface. In C++, it is done using uic(User Interface Compiler). In our case, in python, we use a utility named 'pyuic4'. If 'pyuic4' will be automatically installed while you install PyQt. If not, especially in Linux, install it from the repository. Then make the user interface file 'calc_ui.py' (or any name you wish. But for the first time use this name to avoid ambiguity) file using the command:

pyuic4 widget.ui > calc_ui.py

This command will generate a new file named 'cal_ui.py'. This is the user interface file only. We are going to make another file 'calc.py' which will handle the core program. Use a text editor and copy the code below:

import sys
from PyQt4 import QtCore, QtGui

from calc_ui import Ui_Widget


class MyForm(QtGui.QMainWindow):
    def __init__(self, parent=None):
        QtGui.QWidget.__init__(self, parent)
        self.ui = Ui_Widget()
        self.ui.setupUi(self)
    def calc_sum(Widget):
    value1=Widget.ui.a.text();
    value2=Widget.ui.b.text();
    result=float(value1)+float(value2);
    str_result=str(result)
    Widget.ui.sum.setText(str_result);


if __name__ == "__main__":
    app = QtGui.QApplication(sys.argv)
    myapp = MyForm()
    myapp.show()
    sys.exit(app.exec_())

Save the file. Then run the file:

pyhon calc.py
I am not so good in explaining the code. I think you got the idea of how to make a custom slot and to make a standalone program. If any reader need clarification or more explanation, I will try to explain further.

Saturday, August 6, 2011

Qt Programming in Malayalam Part-2

Before reading this tutorial, read my previous post "Qt programming in Malayalam" if you have not read it yet.
    Have you ever wonder about easy switching from English to other languages such as French, Spanish etc. in software applications? Even though Malayalam switching is rare, translation is possible in Malayalam as well like any other language. Qt provides an easy way of language switching by means of Qt linguist. This tutorial describe how to build a Malayalam switchable application in Qt. An easy to start tutorial is packaged with Qt Help itself. Here is a quick tutorial of how to build a Malayalam application if you have the source code of the English version. Before we start, I assume:
1) You have Qt installed in your PC.
2) You have a very basic knowledge of Qt programming. How to compile, build and all.
    If the above is not qualified, sorry, it is better to pause here and read this and resume. Suppose you have a Qt application in English (If you have not your own, a lot of examples  are there in qtdir/qt/examples. (qtdir is the directory where you installed Qt). For better understanding, I prefer an application named 'QMusicPlayer' from examples(qtdir/qt/examples/phonon/qmusicplayer). You can take other examples as well. Open qmusicplayer.pro using Qt, then build and run it. You will get a minimal musicplayer in English. Now our aim is to make the malayalam version of the same application.


Now we need to edit two files 'main.cpp' and 'qmusicplayer.pro' as follows:

main.cpp

#include

#include "mainwindow.h"
#include

//![1]
int main(int argv, char **args)
{
    QApplication app(argv, args);
    QTranslator translator;
    translator.load("malayalam");
    app.installTranslator(&translator);

    app.setApplicationName("Music Player");
    app.setQuitOnLastWindowClosed(true);

    MainWindow window;
    window.show();

    return app.exec();
}

qmusicplayer.pro

QT        += phonon

HEADERS   += mainwindow.h
SOURCES   += main.cpp \
             mainwindow.cpp
TRANSLATIONS = malayalam.ts

# install
target.path = $$[QT_INSTALL_EXAMPLES]/phonon/qmusicplayer
sources.files = $$SOURCES $$HEADERS $$FORMS $$RESOURCES *.pro *.png images
sources.path = $$[QT_INSTALL_EXAMPLES]/phonon/qmusicplayer
INSTALLS += target sources

wince*{
DEPLOYMENT_PLUGIN += phonon_ds9 phonon_waveout
}

symbian:TARGET.UID3 = 0xA000CF6A

Changes made in the code are highlighted. The changes in code simply add a Translator feature to your application. While running, your application will seek a file named 'malayalam.qm' which contains one to one translation of all English words used in program to Malayalam. 'malayalam.qm' is a binary file and is to be generated from a file named 'malayalam.ts'. This file is automatically generated using the command in terminal:

lupdate -verbose qmusicplayer.pro

Then the newly generated file - 'malayalam.ts' can be seen in the project directory. But it is an empty file and we need to update that file with all one to one translations. To do so, open the file with Qt linguist:

linguist malayalam.ts

If you couldn't find any command like 'lupdate' or 'linguist', most probably, you have not added the qt directory to the PATH. To do this use the following command Linux,

PATH=$PATH:qtdir/qt/bin/

directory may be different and must change it as your needs. Then use 'lupdate' and 'linguist'. If you are still stucked, check whether you completely installed Qt SDK. In Windows, if you are using Qt enabled prompt, I hope there will be no any problem.

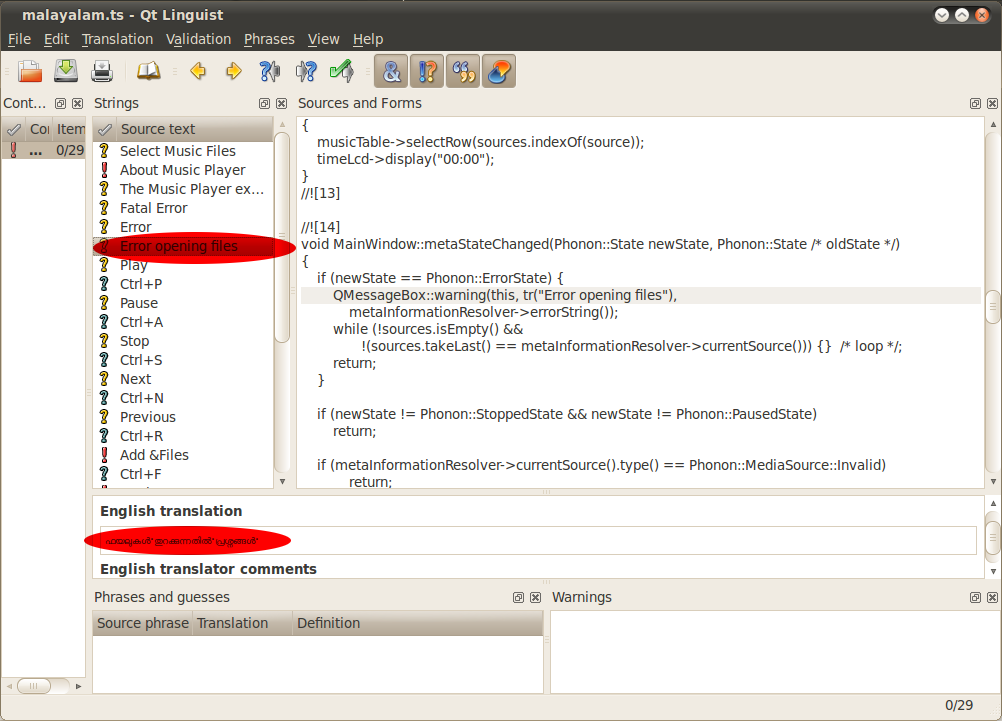
    Now I assume you opened 'malayalam.ts' successfully in Qt Linguist. It shows all english words which translation is enabled. (Refer fig). Click on each english word in 'Source Text' list and add curresponding Malayalam translation in the 'English Translation' edit box at the bottom (highlighted on figure). Repeat the process for all words and save. Then File->Release. It will generate the binary file 'malayalam.qm' in the same directory.
    Now run the qmusicplayer application with file 'malayalam.qm' is placed in the same directory of the executable. Now you can see the malayalam version of 'qmusicplayer'.

In the absense of the file 'malayalam.qm', there will be no run time error in the program, it simply shows the english version. Similarly you can build a multi-lingual swithable version.

Monday, July 4, 2011

ChaserDesigner - A professional approach for fancy light design

This project is published in July 2011 th issue of Electronics For You (EFY) magazine (Page no: 94 to 98) titled:"Microcontroller-Based Light Chaser". Thanks to EFY for publishing this. You can read full article from EFYmagonline or purchase one.

ChaserDesigner is a useful project for fancy light designer professionals  as well as enthusiast who want to make their own LED patterns while decorating home during festivals. It's hardware part is simple one which uses 8051(or any variants of 8051) and a handy software part based on Qt. In the GUI, you need to specify how the pattern appear on LEDs(or connected higher loads) and it will automatically generate the source code for 8051(in assembly language). Only you need to do is that, burn the program in to the micro and put it on the circuit. Then the LEDs start to glow in the designed pattern. This is very handy and there are some tools provided to easily make your own patterns. The software works in Linux, Windows, or MAC and hardware components chosen are almost ubiquitous. In case, if any component found unavailable, please comment, I will try to recommend any alternative if any. I have put source code,circuit diagram and all other associated diagrams free for download.

1. contents.zip - Article before published, circuit diagram, images etc.
http://www.4shared.com/file/MolWxWP_/content.html

2. chaserdesigner_src.zip - Software source code.
http://www.4shared.com/file/zY9fz6LF/chaserDesigner_src.html


3.chaserdesigner1.0.zip - Windows XP executable file
http://www.4shared.com/file/3WmVxoaF/ChaserDesiner10.html


4.videos.zip - videos describing, how to operate the software and hardware.
http://www.4shared.com/file/EagoltHS/videos.html


Note: Since it is published by EFY,  it is better to read this article in EFY to get more pretty article with PCB layout also.

Saturday, August 28, 2010

Qt Programming in Malayalam Part-1


Qt Programming in Malayalam is quite easy. Most of the strings used in Qt is of type QString. QString support all kind of unicode standards. So one can include mathematica and technical symbols, and non-English characters. Malayalam characters are also included in unicode. So usage of Malayalam in Qt is possible almost anywhere in Qt software designing. There are three major standards for unicode- UTF8-8bit, UTF-16-16bit, UTF-32-32bit. QString supports all standards and there's a bunch of translating functions to and fro for transforming QString to other types such as const char*.

You can transform simple programs in Qt to Malayalam with a little care. But still there may be problems while playing with non-English languages. Like other GUI's Qt is also limited in support to non-English languages, but still it is translatable.
Download this example (Windows binary - 4.76MB)
Download the source code (Tested in both Linux and Windows - 3.27KB)

Also read  Qt Programming in Malayalam Part-2

Sunday, April 11, 2010

Qt - Ping Pong Example


This is a simple ping pong (not game) play area example in Qt. You can modify this program to make your own arkanoid/ping pong games. I think it is useful for somebody. All files associated with the program with source can be downloaded. If you are Qt beginner like me, this example will help you how to use QTimer class and time interrupts.

Download ArkanoidArea

Friday, March 12, 2010

Slider game using Qt


It is better to do simple things first in Qt before making hands dirty with complex programs. Now I just prepared a slider game using Qt.Hope all of you know how to play slider game. My code is simple and having a slider panel of 3x3 matrix. I know the code is not much pretty. But I just put my source code to download. It may be helpful for beginners. Of course, you can modify the code to satisfy your needs.
Enjoy!

Download slider.zip
Note: You need to recompile the code before using. I successfully compiled the code in Linux. Of course, you can compile it in other platforms without modification of code.

Tuesday, December 29, 2009

Gui front end for parallel port controller in Linux

A graphical front end for the parallel port controller in Linux was my dream and I just satisfied it in my Xmas vacation. I used Qt framework from Nokia. I just put here everything I did. Of course you are allowed to download and use it under GPL (GNU General Public License). You are appreciated to modify source code according to your needs.
Now the program supports only on Linux platforms even though qt frame work is independent of platform. The reason is that, parallel port controlling is directly depend upon the OS you are used. You can easily control your parallel port in MS DOS environment, but things become worse when you try in Windows XP. Since the program calls the ioperm() function, you should have root privileges. Otherwise an abrupt exiting of the program occur. You only need to do the following things:
  • Be root, and start the program by ./parport2. Try to open it from terminal at least for the first time in order to track bugs.
  • Click 'Initialize' to call ioperm(). If you are not root, then the program abruptly exits while you click it.
  • Nothing will be happened at outside while you click in 'Initialize'.
  • You can use 8 switches to turn on or off the output data ports.
  • The current output value in decimal is displayed on lineEdit.
Most probably the executable version will not work in your system unless your system configuration matches with mine. So it is recommended to compile entire program using qt. You need to have qmake installed in your system (qt-dev-tools). The compiling instructions for qt program is beyond the scope of this post.

Download parport.tar.gz (1.4MB)

I tested it in my PC and worked without any problem.
Warning: Take care while you play with parallel port. Very rarely, the after effect may fatal.
Note:- This program is intended for educational purposes only. May not be updated until anyone report a bug or a request to modify.