Saturday, December 1, 2012

Hi,
This is my last post in this blog. Please visit my new blog here: www.tomkonikkara.in
Thank you.

Saturday, September 3, 2011

PyQt: power of Python, beauty of Qt

Qt is very powerful tool for GUI programming. But programming using Qt C++ is not always easy because of unavailability of libraries and difficulty in coding. But Python is powerful and has abundant list of libraries related to virtually anything. Some operations in Python is very easy to use. But the problem of Python is that, it has no GUI its own as handy. PyGTK (Python and GTK) and PyQt (Python and Qt) are the remedy. Here I am explaining how to start with PyQt.
PyQt has no support from QtCreator yet, but the features of QtDesigner can also be used for the PyQt coding. This tutorial explains how to start PyQt programming if you are already aware of Qt C++ programming. This is not just a 'hello world' program, but the code will do something and make you capable of coding your own programs.
In this example, we are building a simple GUI with three LineEdit bars and a single button. When the button is clicked, the numbers entered in the LineEdit a and b are added and the sum is shown in the third LineEdit.


First of all, make GUI widget in Qt Designer and rename the objects a, b, sum and pushButton as shown in screen-shot below. Also make a custom slot named calc_sum(). Save and quit the Designer program.


Now you can see the user interface file named 'widget.ui' (the filename may vary if you changed the widget name while creating your project. Anyway, the filename with .ui as extension is the file we need). We need to create the curresponding python file for user interface. In C++, it is done using uic(User Interface Compiler). In our case, in python, we use a utility named 'pyuic4'. If 'pyuic4' will be automatically installed while you install PyQt. If not, especially in Linux, install it from the repository. Then make the user interface file 'calc_ui.py' (or any name you wish. But for the first time use this name to avoid ambiguity) file using the command:

pyuic4 widget.ui > calc_ui.py

This command will generate a new file named 'cal_ui.py'. This is the user interface file only. We are going to make another file 'calc.py' which will handle the core program. Use a text editor and copy the code below:

import sys
from PyQt4 import QtCore, QtGui

from calc_ui import Ui_Widget


class MyForm(QtGui.QMainWindow):
    def __init__(self, parent=None):
        QtGui.QWidget.__init__(self, parent)
        self.ui = Ui_Widget()
        self.ui.setupUi(self)
    def calc_sum(Widget):
    value1=Widget.ui.a.text();
    value2=Widget.ui.b.text();
    result=float(value1)+float(value2);
    str_result=str(result)
    Widget.ui.sum.setText(str_result);


if __name__ == "__main__":
    app = QtGui.QApplication(sys.argv)
    myapp = MyForm()
    myapp.show()
    sys.exit(app.exec_())

Save the file. Then run the file:

pyhon calc.py
I am not so good in explaining the code. I think you got the idea of how to make a custom slot and to make a standalone program. If any reader need clarification or more explanation, I will try to explain further.

Saturday, August 6, 2011

Qt Programming in Malayalam Part-2

Before reading this tutorial, read my previous post "Qt programming in Malayalam" if you have not read it yet.
    Have you ever wonder about easy switching from English to other languages such as French, Spanish etc. in software applications? Even though Malayalam switching is rare, translation is possible in Malayalam as well like any other language. Qt provides an easy way of language switching by means of Qt linguist. This tutorial describe how to build a Malayalam switchable application in Qt. An easy to start tutorial is packaged with Qt Help itself. Here is a quick tutorial of how to build a Malayalam application if you have the source code of the English version. Before we start, I assume:
1) You have Qt installed in your PC.
2) You have a very basic knowledge of Qt programming. How to compile, build and all.
    If the above is not qualified, sorry, it is better to pause here and read this and resume. Suppose you have a Qt application in English (If you have not your own, a lot of examples  are there in qtdir/qt/examples. (qtdir is the directory where you installed Qt). For better understanding, I prefer an application named 'QMusicPlayer' from examples(qtdir/qt/examples/phonon/qmusicplayer). You can take other examples as well. Open qmusicplayer.pro using Qt, then build and run it. You will get a minimal musicplayer in English. Now our aim is to make the malayalam version of the same application.


Now we need to edit two files 'main.cpp' and 'qmusicplayer.pro' as follows:

main.cpp

#include

#include "mainwindow.h"
#include

//![1]
int main(int argv, char **args)
{
    QApplication app(argv, args);
    QTranslator translator;
    translator.load("malayalam");
    app.installTranslator(&translator);

    app.setApplicationName("Music Player");
    app.setQuitOnLastWindowClosed(true);

    MainWindow window;
    window.show();

    return app.exec();
}

qmusicplayer.pro

QT        += phonon

HEADERS   += mainwindow.h
SOURCES   += main.cpp \
             mainwindow.cpp
TRANSLATIONS = malayalam.ts

# install
target.path = $$[QT_INSTALL_EXAMPLES]/phonon/qmusicplayer
sources.files = $$SOURCES $$HEADERS $$FORMS $$RESOURCES *.pro *.png images
sources.path = $$[QT_INSTALL_EXAMPLES]/phonon/qmusicplayer
INSTALLS += target sources

wince*{
DEPLOYMENT_PLUGIN += phonon_ds9 phonon_waveout
}

symbian:TARGET.UID3 = 0xA000CF6A
Changes made in the code are highlighted. The changes in code simply add a Translator feature to your application. While running, your application will seek a file named 'malayalam.qm' which contains one to one translation of all English words used in program to Malayalam. 'malayalam.qm' is a binary file and is to be generated from a file named 'malayalam.ts'. This file is automatically generated using the command in terminal:

lupdate -verbose qmusicplayer.pro

Then the newly generated file - 'malayalam.ts' can be seen in the project directory. But it is an empty file and we need to update that file with all one to one translations. To do so, open the file with Qt linguist:

linguist malayalam.ts

If you couldn't find any command like 'lupdate' or 'linguist', most probably, you have not added the qt directory to the PATH. To do this use the following command Linux,

PATH=$PATH:qtdir/qt/bin/

directory may be different and must change it as your needs. Then use 'lupdate' and 'linguist'. If you are still stucked, check whether you completely installed Qt SDK. In Windows, if you are using Qt enabled prompt, I hope there will be no any problem.

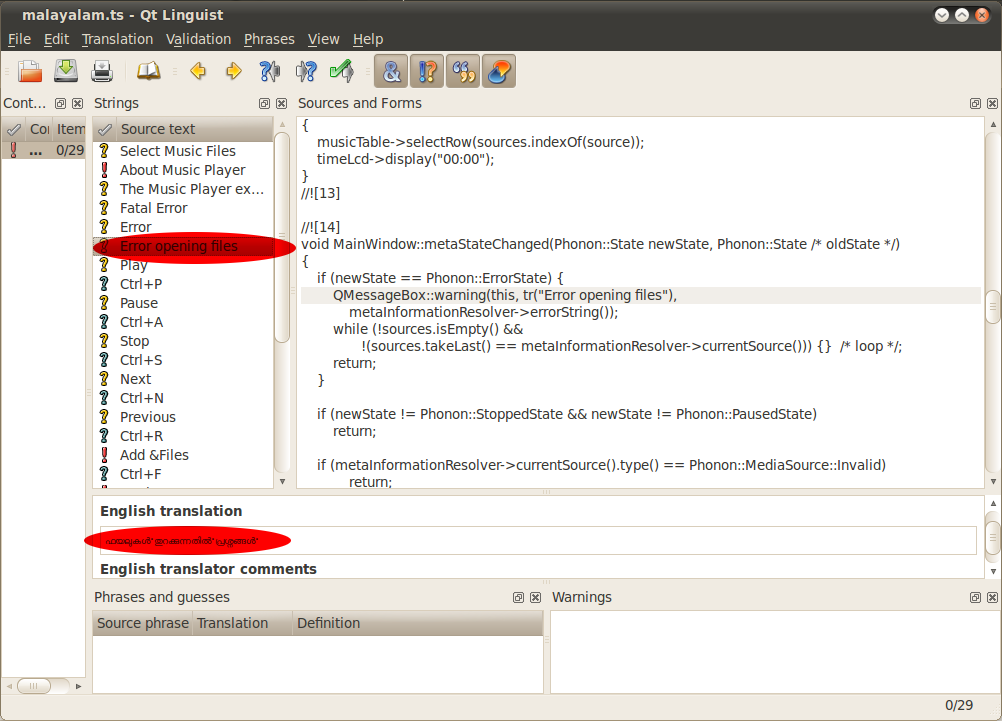
    Now I assume you opened 'malayalam.ts' successfully in Qt Linguist. It shows all english words which translation is enabled. (Refer fig). Click on each english word in 'Source Text' list and add curresponding Malayalam translation in the 'English Translation' edit box at the bottom (highlighted on figure). Repeat the process for all words and save. Then File->Release. It will generate the binary file 'malayalam.qm' in the same directory.
    Now run the qmusicplayer application with file 'malayalam.qm' is placed in the same directory of the executable. Now you can see the malayalam version of 'qmusicplayer'.

In the absense of the file 'malayalam.qm', there will be no run time error in the program, it simply shows the english version. Similarly you can build a multi-lingual swithable version.

Tuesday, July 19, 2011

How to heal? Some keyboard keys are not working

It is a common problem that failing some keys in PC keyboard. But it become cumbersome while you type anything seriously. Replacing or repairing keyboard is not always easy, especially you are using a laptop. The seriousness of the problem depend on the failed key operation. If ENTER, DELETE, SPACE, SHIFT, CTRL, ALT etc are failed, your keyboard is almost at the worst state. Here I am trying share how to dilute this key failure effect.

Method 1 - On screen keyboard(Quickest way)
If you are doing something seriously, and don't have enough time to dismantle keyboard and clean, best method is to use virtual keyboard. On MS Windows, it is built in. You can access it by,
Start - All Programs - Accessories - Accessibility - On-Screen Keyboard
The fundamental advantage is that it is independent on how much keys in your keyboard are failed. Also you can access and use this utility completely using your mouse. In Linux, there is a similar utility named 'onboard' (use command 'onboard' to open it) and most probably it is built in. But it considerably lowers the typing speed.


Method 2 - Key mapper (Quicker enough)
SharpKeys from RandyRants is a good utility (for windows) to assign function of one key to another key. It can be done using a registry hack, but using Sharpkeys is a handy method. A good number of keys are there in your keyboard which are rarely or not used at all. Function keys F1, F2 ..., Win Key, Home, End, Print Screen, Pause/Break. If you use only left or right CTRL key is using other can be contributed for other function, because right and left CTRL keys are considered different. The same is applicable to SHIFT and ALT. Although this method slightly lowers your typing speed, you can still do everything.


Method 3 - Cleaning
Open it, clean well. If you are lucky, it will give life to your keyboard (I am unlucky).


Method 4 - Repair or Purchase
This is the last way. Of course, result will be positive.

Saturday, July 16, 2011

LED Matrix pattern designer

LEDmatrix pattern designer is a tool used to generate matrix(2D) patterns in hex numbers for displaying LED matrix using a micro controller.

It is based on Qt framework and hence cross platform. It supports up to 16x16 matrix size. You can increase it by making minor changes in the sourcecode, but 16x16 is enough for most cases. This is done from the same pace of my previous project - ChaserDesigner. Only you need to do is that, specify the 2D pattern either manually or using the enhancing tools provided by the software. Then you can generate it's hex equivalent by a single click. A 2D pattern can be scanned either horizontally or vertically. The scanning mode can be switched in the software while making frames.

I think most of the features of the software are self explanatory. If you have any doubts, please comment. All files associated with this project are free to download.
Project source(Linux, Windows)
Windows executable
Required dlls for Windows executable

Wednesday, July 6, 2011

How to make bitmaps for graphic LCD (glcd)?

Making bitmaps for graphic LCD is pretty easy. There is a lot of free tools available over Internet, but I think there is no need to download them if you have already installed an image editing software in your PC. Also it is interesting to know what's actually they do. In this quick tutorial,  an example using GIMP - a free image manipulation program is described. This is a general tutorial and can be applicable for almost all type of graphical LCDs.

Step1: Know the pixel size of your graphic LCD. For KS0108 (a general purpose glcd), it is 128x64.
Step2: Choose an image(any image) to be embedded on LCD.
Step3: Scale the image to 128x64. In GIMP, (menu)Image -> Scale Image. Change height to 64 and width to 128.
If your image is not an exact multiple of 128x64 and if you want to keep the aspect ratio, you need to do any of the following:
a) Crop the image to 128x64.From toolBox(dock in the left hand side most probably), choose Rectangle Select Tool and spcify the size to 128x64 in the bottom of toolbox and select a portion you want and crop it. (menu)Image -> Crop to Selection.
b) Resize the image to less than or equal to 128x64. Then start a new image by (menu)File -> New. Then from the dialog box choose size as 128x64. Copy the previous image to the new image.
c) If you want to just check and image is not matter, image search on Google specifying the size 128x64 ;-)
Step4: Before going to this step, I assume you have an image of the same size of your LCD. In this example, 128x64. Next is the conversion of your color image to monochrome image. For that, choose, (menu)Colors -> Threshold. Using the dialog box, you can change the threshold in realtime.
Step5: Change mode.(menu)Image -> Mode -> Indexed.From the dialog box, choose 'Use Black and White (1bit) palette'. Click 'Convert'
Step6: Save the image.(menu)File -> Save as. Choose extension .bmp (bitmap).

Now your image is ready for embedding to your LCD. For some programs like MikroC for PIC, there is a built in tool to convert the bitmap into array. If you don't have such advanced tools, don't worry, let's do it using open source tools.
Using Octave/Matlab for KS0108
Now you have a monochrome bitmap of only zeros and ones. Now it should be grouped and formatted to a format supported by glcd. I did the conversion using octave. The script shown below accepts the bitmap name as argument and convert it to the glcd compatible form. make appropriate changes to run the script in MATLAB. Also change yourself the program if your lcd size is different.
#This code input a monochrome bitmap of size 128x64 and convert it to a form compatible to ks0108 graphic lcd(glcd)
arg_list=argv();
x=imread(arg_list{1}); #accept argument
num=0;
printf("Controller 1 (left)\n\n");
page=0;
for offset = [1:8:64]
    printf("Page %d:\n",page);
    page+=1;
    for j=1:64
        for i=[offset:offset+7]
            num=num+x(i,j)*(2^(i-offset));
        endfor
        printf("%d ",255-num);
        num=0;
    endfor
    printf("\n\n");
endfor
printf("Controller 2 (right)\n\n");
page=0;
for offset = [1:8:64]
    printf("Page %d:\n",page);
    page+=1;
    for j=65:128
        for i=[offset:offset+7]
            num=num+x(i,j)*(2^(i-offset));
        endfor
        printf("%d ",255-num);
        num=0;
    endfor
    printf("\n\n");
endfor

Monday, July 4, 2011

ChaserDesigner - A professional approach for fancy light design

This project is published in July 2011 th issue of Electronics For You (EFY) magazine (Page no: 94 to 98) titled:"Microcontroller-Based Light Chaser". Thanks to EFY for publishing this. You can read full article from EFYmagonline or purchase one.

ChaserDesigner is a useful project for fancy light designer professionals  as well as enthusiast who want to make their own LED patterns while decorating home during festivals. It's hardware part is simple one which uses 8051(or any variants of 8051) and a handy software part based on Qt. In the GUI, you need to specify how the pattern appear on LEDs(or connected higher loads) and it will automatically generate the source code for 8051(in assembly language). Only you need to do is that, burn the program in to the micro and put it on the circuit. Then the LEDs start to glow in the designed pattern. This is very handy and there are some tools provided to easily make your own patterns. The software works in Linux, Windows, or MAC and hardware components chosen are almost ubiquitous. In case, if any component found unavailable, please comment, I will try to recommend any alternative if any. I have put source code,circuit diagram and all other associated diagrams free for download.

1. contents.zip - Article before published, circuit diagram, images etc.
http://www.4shared.com/file/MolWxWP_/content.html

2. chaserdesigner_src.zip - Software source code.
http://www.4shared.com/file/zY9fz6LF/chaserDesigner_src.html


3.chaserdesigner1.0.zip - Windows XP executable file
http://www.4shared.com/file/3WmVxoaF/ChaserDesiner10.html


4.videos.zip - videos describing, how to operate the software and hardware.
http://www.4shared.com/file/EagoltHS/videos.html


Note: Since it is published by EFY,  it is better to read this article in EFY to get more pretty article with PCB layout also.

Saturday, June 11, 2011

One day PyBrain came to power....

Recently, I went straight away to PyBrain and found it is useful to AI researchers and enthusiasts. Python rocks once again. PyBrain is a modular library for python. As far as PyBrain developers is concerned, it is Python Based Reinforcement Learning, Artificial Intelligence and Neural Network Library. PyBrain is opensource and it is licensed under BSD software license.
PyBrain simulates neural networks inside our brain in a computer. Once you created the neural networks, you need to train it for a particular task. Sometimes training of more than thousand times is required to properly get done it's job. Sometimes, training will be frustrating especially when you didn't give proper degree of freedom to the neural network structure. However, I found pyBrain interesting.
It is good idea to start with pyBrain documentation. In the beginning of the tutorial, they provide a simple example of training for an X-OR gate. But it will take a lot of training steps to work properly. But for the same neural network structure, if you are trying to simulate an AND gate or an OR gate, you probably get everything done.

Wednesday, March 9, 2011

Story of a 'spinning lady'


Did you notice the figure above? To see the spinning lady, click this link and return back. Is it a spinning lady? In which direction, you feel the lady is spinning? clockwise or counter-clockwise? One can feel the spinning of the lady in either clockwise or counterclockwise. But once you feel lady spin in one direction, your brain continues in that state and insist to be in that state. If you feel that the lady is spinning in clockwise, it is too difficult to see the motion in counter-clockwise direction. But sometimes our brain switches from one state to other state automatically, but changing the state of feeling of brain is difficult to achieve manually.
This is a beautiful eye illusion. Do you know how that beautiful lady, cheated your brains?
Answer is, the lady didn't cheat you, but the cheater is her shadow. Actually, the image shows the shadow of a spinning lady. In this, a 'shadow' plays in important role in cheating you. The pure shadow of an image will not provide the entire information about an object to the brain. From a shadow, we can't predict whether the front side or backside of the object we are viewing. If you didn't understand what I just said, please go through an example.
Look at the picture below.
The middle picture is photo-shot of the spinning lady. Concentrate on the picture and tell what you are viewing- the frontside or backside? It may be both. Look at the left picture. It is the modified version of middle one by adding eyes in her face. Now you feel that you are viewing the front side of the lady. At the same time, you see the backside of the lady in the right picture, but that also a modified version of middle picture with marking of a hair bud. This is important to be noted. While you are viewing the middle picture only, your brain fall in to the mess of finding whether the shadow is of the front side or backside. Then your brain 'randomly' choose one possibility (not actually). But in other pictures, your brain has powerful proof that indicates the state of the lady's body.
Now the problem associated with the spin direction of the lady is not vague. If your brain 'assumed' a side of the lady's body you are viewing, this will determine which direction, she is spinning.

Monday, February 14, 2011

Make yourself a Qt Hacker

A presentation of Qt for beginners was held in Jyothi Engineering College for ISTE students. It was taken by me and I have just put the presentation and the associated files here and think it may be useful for those people who have attended. For any doubts, feel free to ask me.
Download files here

Saturday, November 27, 2010

Just bought an Arduino, What's next?


This article briefly explain what is to be done just after purchasing an Arduino board. Even though the prerequisites of Arduino is less compared to other development boards, I think this article will be useful because Arduino is being popular among beginners. This article deals with the latest version of Arduino at the time of writing - it is Arduino UNO.
Setting up drivers
Connect Arduino to your computer via USB cable. It will power up from USB power. Now start Arduino IDE. If you have not Arduino IDE download from here. No need to install the software. Just extract using your favourite decompressing utility (my favourite is 7zip) and run the executable named 'Arduino'. Now you have to set up your IDE to work with your Arduino UNO. First select your hardware from Tools -> Board -> Arduino UNO (or your exact hardware name. If it is not listed, try to download the latest version). Next, select your serial port from Tools -> Serial Port. Selecting serial port is in different way different OS.
Linux
If the 'Serial Port' menu is not active, probably, your device is not connected properly. Try to reconnect. If more than one serial ports are shown in the menu, we need to find out which is the correct one. To do that, disconnect your arduino first. Then you probably need to restart the IDE. Then look at the 'Serial Port' menu and note down the listed COM ports. Then reconnect your device and track the newcomer. This is the easy way. Select it.
One of the problem I suffered while playing with arduino in my Ubuntu 10.04 LTS was that, the compilation of the program was a failure. It was a dependancy problem. So what I did is that, installed Arduino IDE as described here. But it was an older version and my device UNO is not listed in it. Then downloaded the newer version from the downloads page. That was really a tricky step!
MS Windows
In Windows, just after connecting your device to the PC, a device driver wizard appears and try to find the appropriate device driver for the device. It will take a while and at the end of the fight, it fails to find an appropriate driver. Close the wizard and go to 'Device Manger' (Either via Control Panel or by right clicking 'My Computer' then 'Manage'). Then you can find Aduino UNO as the unknown device. Right click on that and choose the option to manually install the driver. Then locate the directory where you have installed Arduino IDE. Then the system install the appropriate driver and now you can see your device on the list named 'Ports' in the Device Manger. In parenthesis, there will be the curresponding COM port number (eg: COM 4) . Then choose that COM port in the Arduino IDE.
Starting with 'Hello World'
The commonly accepted 'Hello World' in embedded devices is LED blinking. There is an example in the IDE itself. Open the file from File -> Examples -> Basics -> Blink
Look at the program. For an average C programmer, the program seems self-explanatory. To compile your program, choose Sketch -> verify/compile. Then to upload the executable to your device, choose,File -> upload to I/O board. If everything you have done is correct, you will get your Arduino programmed and starts working just after burning the program using the USB power. Disconnect it from USB and use in your standalone applications.
Read more..
Arduino Lanugage reference
Arduino Playground

Sunday, November 14, 2010

SMS email alert in mobile phone

One of the major disadvantage while handling e-mail services is that we need to check mails by intervals. Most people checks their account more than once a day. Some people start up their computer to only check the e-mail and finds that 'No e-mail today' and continue their frustrating work after a couple of hours. This type of services are 'pull-email' type services. Conversely, there's a 'push e-mail' service which will send the mail to your mobile devices. But this service is not available in all mobile phones or services. So here is a method which can be used virtually in any mobile phone. This service will alert you whenever you get a new mail with some information about the sender. The alert is done by sending an SMS. Unfortunately, this method can only be applied in INDIA. Sometimes, all mails receiving in your mailbox including spam may not be important to alert. So by setting up your gmail, you can select which type of mails should be alerted.
I assume you have a gmail account. If not, either you can make a new gmail account or a similar approach will work on your other accounts also- explore it. Moreover, you need to have an account in way2sms.com . Register on way2sms (The service of way2sms is currently limited to India only). You will get your own free email address in way2sms domain.
Setup in gmail account
Go Settings->Filters
Click 'Create a new filter'. Then a box will appear which shows that which type of mails are to be forwarded to way2sms.com. For example, if you type user@gmail.com in the 'from line-box', all mails from user@gmail.com will be filtered. There are several other options also. You can test your filter by clicking 'Test Search'.
Click 'Next Step' button. Then a new box will appear. Check 'Forward it to' option and enter your way2sms email address.
Click 'Create Filter'.
Now onwards, all your filtered mails will be sent to your way2sms email.
Set up in way2sms account
Log in to your way2sms account.
Click 'Mail Alerts' link in the top right corner of the page. Here you can activate mail alerts for 14 days. After 14days, it will be automatically deactivated. So it is needed to activate the alerts in every two weeks. You can deactivate it at any time.
Done. Now you will get an alert SMS whenever you receive a new e-mail.

Sunday, November 7, 2010

Set up Toshiba L650 laptops after ubuntu installation

This article explains how to set up device drivers after installing Ubuntu in Toshiba laptops. Most probably Ubuntu will not support LAN, WiFi, Bluetooth and in some systems, anomaly in working of fan, battery are reported. Some of my problems like LAN setup, WiFi and Bluetooth have overridden and my battery is still showing some problems. I hope these instructions will be helpful for Toshiba Laptop users. Note that this article is a "how I did" type article rather than a "how to".
Some models of Toshiba Satellite are preloaded with Windows and some are not. In pre-installed models, try to make the system dual boot. There are a lot of tutorials for that and in Ubuntu, this is pretty easy compared to other distros. Anyway, I assume you have Toshiba system with a fresh Ubuntu installed. I used Ubuntu 10.04 LTS on by Toshiba L650-i5310.
Setting up Ethernet
My ethernet card was from Atheros Communications. A driver for Atheros is available from http://linuxwireless.org/download/compat-wireless-2.6 . Download and unzip the file. Then in terminal, cd into that folder. Then type the following code:
scripts/driver-select atheros
make
sudo make install

Then reboot the system.
Setting up Wireless
My Wireless LAN card was from Broadcom Corporation. The driver is readily available from ubuntu repository.
sudo apt-get install bcmwl-kernel-source
echo wl | sudo tee -a /etc/modules

Reboot the system.
Setting up Bluetooth
In bluetooth, I did nothing in Ubuntu and I installed a bluetooth driver from Toshiba in Windows 7. After that incident, my Ubuntu also start detecting bluetooth adapter and don't know how this happened.

Saturday, September 18, 2010

How to run custom scripts at Linux startup?

It is a good idea to make your own scripts at the Linux start up. Here I am explaining the things with a simple example. I want to make a directory in desktop named 'folder' in each start up. If it is deleted, a new 'folder' is created in the same place in the next start up. Here is what I did.
first make a new script- here 'my_own_script'. Open the file in gedit and add the following:
#! /bin/bash
# chkconfig: 345 40 60
mkdir /home/tom/Desktop/folder
You need to change to the correct path in 3rd line. Here 345 means different run levels and 40 and 60 are the order for start and stop. save the file in /etc/init.d .
Then open terminal and execute this command:
chkconfig --level 345 my_own_script on
Then restart you computer and you can see a directory named 'folder' on your desktop in each start up. For more details, use:
man chkconfig
The mkdir command can be replaced by your own custom scripts. This worked on my PC powered with fedora 12. I found in linux forums that, it will work on Redhat/CentOS/Mandriva.
Start up programs are sometimes irritating and delay start up. So if you want to turn off your script from next start up, use command:
chkconfig --level 345 my_own_script off

Thursday, September 9, 2010

Indian languages support and software tools

Indian Govt. have an official website for Indian language support. You can download language support and software tools from this website or order for a free CD. The major tools are:
  1. True type fonts with keyboard driver
  2. Multifont keyborad engine for the true type fonts
  3. Unicode complient fonts
  4. BHARATEEYA Open Source
  5. Language OCR
  6. Language spell checker
  7. Bilingual dictionary
  8. Font design tool
  9. Transliteration tool
  10. Language text editor
  11. Tutor package
  12. Text to speech system
  13. Database sorting tool
  14. Number to word tool
  15. Typing tutor
  16. Language suppoted microsoft excel
  17. Type assistant
The CD is released by Ministry of Communications and Information Technology, Government of India. Contibuters are, C-DAC, Cyber space multimedia Ltd.,C K Technologies, Cadgraf Digitals System Ltd., Cyber Thomson, IMRC.
Click here to visit Technology Development for Indian Languages(TDIL).

Monday, August 30, 2010

Reveal Them! A Qt entertainment

I do some Qt exercise when I get leisure time. RevealThem is just the after effect but I hope source code will be useful for somebody. While I was over consuming my vacation in front of TV, found a nice program like RevealThem. Hiding a celebrity behind a brick wall, and player can remove bricks one at a time so that, a part of the face is visible. People get higher points if they identify the celebrity with minimum number of picks. I found it was interesting to realize in Qt.
How to use the software?
Step1: Download the program(Go to end of this post)
Step2: Download some pictures of celebrities in .jpg format and save it in images/ directory in the directory where the program is installed.
Step3: Open the executable and click 'Load Image'. then you can pick bricks by clicking on it and select correct answer from the list and click 'Check' button. For each pick you, lose your 10 points.
Step4: This program is just for fun only.

Download source code (Tested in both Linux and Windows - 3.27KB)
Download Windows binary (5.03MB)

Saturday, August 28, 2010

Qt Programming in Malayalam Part-1


Qt Programming in Malayalam is quite easy. Most of the strings used in Qt is of type QString. QString support all kind of unicode standards. So one can include mathematica and technical symbols, and non-English characters. Malayalam characters are also included in unicode. So usage of Malayalam in Qt is possible almost anywhere in Qt software designing. There are three major standards for unicode- UTF8-8bit, UTF-16-16bit, UTF-32-32bit. QString supports all standards and there's a bunch of translating functions to and fro for transforming QString to other types such as const char*.

You can transform simple programs in Qt to Malayalam with a little care. But still there may be problems while playing with non-English languages. Like other GUI's Qt is also limited in support to non-English languages, but still it is translatable.
Download this example (Windows binary - 4.76MB)
Download the source code (Tested in both Linux and Windows - 3.27KB)

Also read  Qt Programming in Malayalam Part-2

Friday, August 27, 2010

Malayalam for Windows

*Note: The above information is adapted from the resources of http://malayalam.web4all.in
The information in this post is specific to Malayalam users in Kerala, India. Other readers may not find anything useful in this post
"I need to do some work in Malayalam in Windows XP. What should I need to do?''
My post here tries to find the answer for the above question. Malayalam implementation can be done in two ways.
1)In-script keyboard - Each corrector in Malayalam is assigned to the key layout in the US keyboard. It become easier only after some practice2)Transliteration - This is easier method for beginners. In this method, you just type a word similar to the Malayalam word. (For example അമ്മ in Malayalam can be printed on screen by typing 'amma' in English.

Setting up Windows XP for In-script keyboard
Step1: Go to Control Panel->Regional and Language Options
Click on 'Language' tab
Step2: Check whether the check-box corresponding to "Install files for complex script and right to left languages(including Thai).
If not check it. If it is already checked, go to Step5.Step3: Then Computer ask your Windows CD for further installation of fonts. Then put your CD on the drive and click OK. Wait until complete installation. Then reboot your system after closing all dialog boxes.
Step4: Again do Step1 and this time the check-box will be checked.
Step5: Click 'Details' button. Then click 'Add' on the new dialog box. Choose Malayalam(India) and click OK.
Step6: Close all dialog boxes. In your task bar, you can see the current layout as 'EN" by default. Click on it and choose Malayalam from the list. Then 'EN' is changed to 'MY'. Now Malayalam keyboard is activated. and you can start type in Malayalam.
Open Wordpad (or any other text editor) from Start menu and start typing in Malayalam.

Setting up Windows XP for Transliteration
Step1: Download Mozhi Keyman from this link. Install it.
Step2: Just after installation, Mozhi Keyman icon will be visible on your task bar. Click on it and choose 'Mozhi Keymap' from the following list and you are done.
Open a text editor- I recommend Wordpad and type 'amma' and press enter. You can see the difference now.

You will get more information and support from
http://smc.org.in
http://malayalam.web4all.in

Sunday, July 4, 2010

mcu8051 IDE for Windows

mcu8051IDE can now be used in Microsoft Windows also. If you are not aware of mcu8051IDE, read my previous post: Introduction to mcu8051IDE

Download the following:
First install ActiveTcl and SDCC and then mcu8051IDE.
Then you have just completed mcu8051IDE installation in windows.
If you want to report bug, go here.

How to activate BSNL 3G in iPhone?

Maintaining iPhone features in India is not easy because almost all mobile phone users are belong to Nokia or Sony Ericsson. So support for Apple iPhone is less. To use BSNL 3G features, you require a 3G supported mobile phone and BSNL 3G USIM. Normally to get activated in BSNL 3G, you need to send {your mobile model} to 58355:

example: NOKIA E65
to 58355

It worked for my Nokia E65. But for iPhone it is currently not possible because, they are not having the settings for Apple iPhone. I activated 3G successfully and I did what follows.

Step1: Go Settings->General->Network->Cellular Data Network
Step2: Edit under the tab - Cellular Data
APN => bsnlnet
Usename => {Left blank}
Password => {Left blank}
Step3: Go Settings->General->Network
Step4: Switch 'Enable 3G' to ON. Also switch 'Cellular Data' to ON if not.

*Note: 3G will work if you are in a 3G coverage. Else you can get connected and use internet with 2G or 2.5G. If you are not in a 3G coverage area, it is better to turn off 3G. This will save a lot of battery. If you are in a 3G coverage, and you turned on 3G on your iPhone, a '3G' symbol will be displayed on top left corner of your iPhone screen. If you are in 2G, a 'E' symbol is displayed to remind that you are in EDGE network.

Step5: You are done. Use 'Safari' to browse internet.

If you are having any problem please report. If you found any other methods, please comment about it.