A presentation of Qt for beginners was held in Jyothi Engineering College for ISTE students. It was taken by me and I have just put the presentation and the associated files here and think it may be useful for those people who have attended. For any doubts, feel free to ask me.
Download files here
Showing posts with label Open Source. Show all posts
Showing posts with label Open Source. Show all posts
Monday, February 14, 2011
Thursday, September 9, 2010
Indian languages support and software tools
Indian Govt. have an official website for Indian language support. You can download language support and software tools from this website or order for a free CD. The major tools are:
Click here to visit Technology Development for Indian Languages(TDIL).
- True type fonts with keyboard driver
- Multifont keyborad engine for the true type fonts
- Unicode complient fonts
- BHARATEEYA Open Source

- Language OCR
- Language spell checker
- Bilingual dictionary
- Font design tool
- Transliteration tool
- Language text editor
- Tutor package
- Text to speech system
- Database sorting tool
- Number to word tool
- Typing tutor
- Language suppoted microsoft excel
- Type assistant

Click here to visit Technology Development for Indian Languages(TDIL).
Friday, August 27, 2010
Malayalam for Windows
*Note: The above information is adapted from the resources of http://malayalam.web4all.in
The information in this post is specific to Malayalam users in Kerala, India. Other readers may not find anything useful in this post
"I need to do some work in Malayalam in Windows XP. What should I need to do?''
My post here tries to find the answer for the above question. Malayalam implementation can be done in two ways.
1)In-script keyboard - Each corrector in Malayalam is assigned to the key layout in the US keyboard. It become easier only after some practice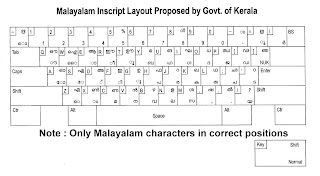 2)Transliteration - This is easier method for beginners. In this method, you just type a word similar to the Malayalam word. (For example അമ്മ in Malayalam can be printed on screen by typing 'amma' in English.
Setting up Windows XP for In-script keyboard
Step1: Go to Control Panel->Regional and Language Options
Click on 'Language' tab
Step2: Check whether the check-box corresponding to "Install files for complex script and right to left languages(including Thai).
If not check it. If it is already checked, go to Step5. Step3: Then Computer ask your Windows CD for further installation of fonts. Then put your CD on the drive and click OK. Wait until complete installation. Then reboot your system after closing all dialog boxes.
Step4: Again do Step1 and this time the check-box will be checked.
Step5: Click 'Details' button. Then click 'Add' on the new dialog box. Choose Malayalam(India) and click OK.
Step6: Close all dialog boxes. In your task bar, you can see the current layout as 'EN" by default. Click on it and choose Malayalam from the list. Then 'EN' is changed to 'MY'. Now Malayalam keyboard is activated. and you can start type in Malayalam.
Open Wordpad (or any other text editor) from Start menu and start typing in Malayalam.
Setting up Windows XP for Transliteration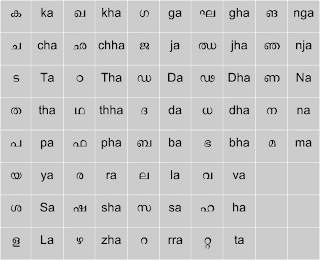
Step1: Download Mozhi Keyman from this link. Install it.
Step2: Just after installation, Mozhi Keyman icon will be visible on your task bar. Click on it and choose 'Mozhi Keymap' from the following list and you are done.
Open a text editor- I recommend Wordpad and type 'amma' and press enter. You can see the difference now.
You will get more information and support from
http://smc.org.in
http://malayalam.web4all.in
The information in this post is specific to Malayalam users in Kerala, India. Other readers may not find anything useful in this post
"I need to do some work in Malayalam in Windows XP. What should I need to do?''
My post here tries to find the answer for the above question. Malayalam implementation can be done in two ways.
1)In-script keyboard - Each corrector in Malayalam is assigned to the key layout in the US keyboard. It become easier only after some practice
 2)Transliteration - This is easier method for beginners. In this method, you just type a word similar to the Malayalam word. (For example അമ്മ in Malayalam can be printed on screen by typing 'amma' in English.
Setting up Windows XP for In-script keyboard
Step1: Go to Control Panel->Regional and Language Options
Click on 'Language' tab
Step2: Check whether the check-box corresponding to "Install files for complex script and right to left languages(including Thai).
If not check it. If it is already checked, go to Step5.
 Step3: Then Computer ask your Windows CD for further installation of fonts. Then put your CD on the drive and click OK. Wait until complete installation. Then reboot your system after closing all dialog boxes.
Step4: Again do Step1 and this time the check-box will be checked.
Step5: Click 'Details' button. Then click 'Add' on the new dialog box. Choose Malayalam(India) and click OK.
Step6: Close all dialog boxes. In your task bar, you can see the current layout as 'EN" by default. Click on it and choose Malayalam from the list. Then 'EN' is changed to 'MY'. Now Malayalam keyboard is activated. and you can start type in Malayalam.
Open Wordpad (or any other text editor) from Start menu and start typing in Malayalam.
Setting up Windows XP for Transliteration

Step1: Download Mozhi Keyman from this link. Install it.
Step2: Just after installation, Mozhi Keyman icon will be visible on your task bar. Click on it and choose 'Mozhi Keymap' from the following list and you are done.
Open a text editor- I recommend Wordpad and type 'amma' and press enter. You can see the difference now.
You will get more information and support from
http://smc.org.in
http://malayalam.web4all.in
Saturday, March 27, 2010
FEL: Qucs tutorial for beginners Part1

Qucs- Quite Universal Circuit Simulator - is now as the name suggests, quite universal. Pspice, Tina Pro etc give a very fine experience for circuit designers. But as far as a student is concerned, buying them seems difficult. Even though SPICE and its open source derivatives were free to download, their user interface was diffcult to be handled by a beginner. In such cases, people go for a demo version. But some people need freedom to do anything and Qucs is intended for such people.
Qucs is opensource an run on both Linux and Windows platforms. Most probably, you can find the binary in your OS repo while a readily installable file is available for Windows users.
After successful installation, launch qucs from menu or entering command 'qucs' and hitting enter. A window similar to figure shown will appear with a plane work space. Click components and add std. compnents to workspace by drag and drop. You can change the component parameter by double clicking on the component. A label should be added to the workspace to indicate that which simulation you are doing. For a beginner, it is easy to learn simulation in Qucs after watching this video: Qucs.ogv
Download Qucs video tutorial : Qucs.ogv
Download Qucs sources.
Download Qucs for Windows
Note: You need FreeHDL to be installed along with Qucs in order to simulate digital circuits properly. It will be installed automatically if you install it from repo. If not, you should manually download and install and reinstall Qucs if necessary.
Monday, March 22, 2010
FEL: Introduction to MCU8051IDE

There is a lot of free and propitiatory IDEs for micro controllers. Here I like to write about MCU 8051 IDE - An open source project packaged under FEL (Fedora Electronic Lab). Intel 8051 is a standard micro controller and that's why it is essential in engineering syllabus even though some good stuffs are there in newer micro controllers from Microchip, Atmel etc. Simulating 8051 is pretty easy if you own a good 8051 IDE. There is a lot of IDEs available for 8051 simulation and emulation. But it is not a good idea to spent your valuable money for that, if such good free and open source IDEs are available. I am just coming to my point. It is about MCU 8051 IDE. It is packaged with fedora electronic lab. If you intend to stick with other OS, you need to compile the source code. Currently it supports more than 79 MCUs. Know more and how much powerful it is. I have uploaded a screencast of MCU 8051 IDE and I think it is enough to start with for a beginner who knows assembly level programming in 8051. Of course, one can write and simulate the program in C also.
Download video tutorial mcu8051.ogv.
You can view the screencast with VLC media player or any other ogv supported media player.
mcu8051IDE for Windows
Sunday, February 14, 2010
Yo Frankie: Open Game Project from Blender
Do you remember Big Buck Bunny?

'Big Buck Bunny'(Code-named Peach)is a classical animated short film entirely from Blender platform which is open source. The video reveals the power of Blender of course, and also contains a neat story with full of fun. If you didn't see this short film yet, you are too late, but here is the chance to download. The hero in this film is a big Buck. Other characters are some naughty animals named Frank, Rinky and Gamera. I personally like Frank's acting than others. I think many people realize that secret, that is why the rise of new open game named Yofrankie (Code-named Apricot). The name came from Frank's name and hero is Mr. Frank. You need to download the game (~120MB) which will run on a Blender engine or Crystal space. Another good side of YoFrankie is that you ca n develop it in your way wince it is open source. A number of good tutorials are there published in the official website. Both Big Buck Bunny film and YoFrankie are released under Creative Commons Attribution License. Watch a video of Yofrankie below:

'Big Buck Bunny'(Code-named Peach)is a classical animated short film entirely from Blender platform which is open source. The video reveals the power of Blender of course, and also contains a neat story with full of fun. If you didn't see this short film yet, you are too late, but here is the chance to download. The hero in this film is a big Buck. Other characters are some naughty animals named Frank, Rinky and Gamera. I personally like Frank's acting than others. I think many people realize that secret, that is why the rise of new open game named Yofrankie (Code-named Apricot). The name came from Frank's name and hero is Mr. Frank. You need to download the game (~120MB) which will run on a Blender engine or Crystal space. Another good side of YoFrankie is that you ca
 n develop it in your way wince it is open source. A number of good tutorials are there published in the official website. Both Big Buck Bunny film and YoFrankie are released under Creative Commons Attribution License. Watch a video of Yofrankie below:
Friday, February 5, 2010
Kolibri : Just 3MB size for this OS!

I am a fan of small operating systems, because, I really suffered the problems of bulky operating systems. I used puppy Linux (It's something great), Damn small Linux etc. Damn small Linux is only 50MB in size and works much fine. Some floppy Linux comes in 1.44MB but it has no GUI at all. A normal user need GUI with some office applications, media player, internet browser, email client, need some programming, and games. But all of the listed above is not included in the floppy linux at all, but almost all are covered by Puppy Linux and DSL. Average of 50MB is happy for me, but for some users, it is too high!. This is what the reason of development of ultra small OS with a size of only 3MB.
The 3MB sized OS is named 'Kolibri' which means humming bird- world's smallest bird. Kolibri is moderately fare OS for eyes with very high performance. In order to increase efficiency of code, OS itself is written is assembly language. I installed Kolibri in my pen drive. The boot up time is less than 3 seconds. I really shocked while seeing the stuff included in just a 3MB. About 30 classic games, text editor, image viewer, text based internet browser, hex editor, assembler,music player, of course a shell and many more. kolibri argues that, it is not windows, linux or anything. It's shell which can accept only 20 commands. But I found all are linux/unix cmmands. There is a bunch of 3D demoes which are excellent.
Go to Kolibri official wesite.
How to install?
You can download iso image and write it to a CD. But I felt ashamed to write 3MB sized iso image to CD. So I opted my pen drive. Installed it using windows XP. It can be installed using linux also. Download image for floppy/hardware first and unzip it. You probably need 7zip for that. Then copy Kolibri.img into thumb drive. Before copy, you need to fromat your thumb drive/pen drive to FAT32. After copying, go to HD_load->USB_Boot directory and run inst.exe then, run setmbr.exe. You need to reboot now and boot from usb. If you don't know how to boot from usb port, you need to read my old post: Booting from CR-ROM or USB devices
Sometimes, you need bulk operating systems to get your job properly done. But this type of efforts of developers seems really appreciable.
Tuesday, December 8, 2009
Go on with pyS60
I got a very good feedback from my previous post: "How to simulate PyS60 in your PC". As the request of opentechlab readers, I am attempting to write a brief beginner level tutorial on pyS60 emulator.
Once you are successful in installing and setting up the environment (If you didn't set up yet, click here), it is the time to go on.
Start the emulator program from:
Start->All programs -> S60 Developer tools -> 3rd edition FP2 SDK -> v1.1 -> Emulator
You probably need to wait for a couple of seconds to load it if your system is slow. Then a medium sized window with a full fledged mobile phone appears on the screen.
Now you need to open python. Just do as in your mobile phone. it's in Menu -> Installations -> python.
Now it's ready and do what you want.
Hacking python script
Select options -> Run script ->ball.py
You can move the ball anwhere in the screen. It's a physics simulation example in python. You can see the actual python script by opening ball.py file using any editor (notepad is not recommended. programmers notepad is good). The file is stored in :
C:\S60\devices\S60_3rd_FP2_SDK_v1.1\epoc32\winscw\c\python
Search for the word 'blobsize'. Then you can find a line like:
blobsize = 16
Change the value of blobsize into 25 and save it. Then open ball.py in emulator. Did you notice any change? Similarly you can change acceleration, gravity (what about changing gravity into -0.01 ?) etc.
Developing your own programs
I am just starting with a hello world. Here is the program.
1)Simple hello world
print "Hello World!"
2)Say, hello world
from audio import*
say("Hello World!")
3)graphical hello world!
import appuifw
appuifw.note(u"Hello World!", "info")
It is good practice to make a short cut of python on the mobile desktop by changing options in settings.
Saturday, October 17, 2009
Let's do a simple hack!

If you are not aware of the difference between the words 'Hack' and 'Crack', I recommend you to hear what wikipedia says. Anything you want to do in a propitiatory program like MS Windows which is prohibited by license or it is not intended to do so may be called as crack. But the word 'hacking' has a great meaning which is different from 'cracking'. You can do anything on your open source program. If you are trying to crack your Linux OS which is open source, it may be called as 'hacking'. What is I want to say is that, an open source program can't be cracked because, they provide source code and hacking (cracking!) is allowed by license. If you are trying to beat an open source program, surely it will become a part of development. So an open source program can't be beaten. Hacking is intended for fun, especially by applying intellectual skills on something and and allowed by law. If anything you find violating the law, please call it as 'crack' not 'hack'.

If you are a beginner in Linux, like me, this simple hack will really attract you. This hack is done in my pocket slax 6.1.2 which is installed on my USB pen drive. But you can do this in any linux based distro which has a boot splash screen or login screen. The only thing you need to do is,
Navigate to /boot directory. In pocket slax, it is situated in the following path:
system:/media/sda1/boot
Then you can see one or more image files with .png extension. In slax, it is 'slax.png'. Edit this picture with a suitable image editor and change as you like it. For example, type "Hacked by
Saturday, October 10, 2009
Mouse gestures for Mozilla Firefox

Mozilla Firefox one of the leading power of internet browsers, shows its real power and beauty only when the appropriate add on-s are installed. You can download and use them from Firefox add on page. There are a plenty of add-ons available and no need to specify which is good because it greatly depend upon your tastes. Recently I installed an add-on named All-in-one gestures and I feel it very interesting. You can install by clicking 'add to Firefox' button as you usually do while installing add-on. There provision to change the gesture pattern in the 'preferences' mode. Mouse gesture means that, some operations you done in Firefox such as 'back', 'forward', 'refresh' etc can be done simply by moving your mouse. I experienced no problem with both Windows and Linux platforms. There are tons of interesting add-ons like this. It is really fun to experiment with Firefox add-ons.
Wednesday, August 26, 2009
Linux Demo? What's the hell?
One of the reason why I love linux a lot is that it has no barriers at all. Many programs usually comes as a demo version which will not not be as much handy as a proffessional or full version. Demo versions seems sometimes nasty, and is too dry to wet out appetite. So I hate the word 'Demo' itself.
But what's going on there is the arrival of "Demo Linux". I just wondered for a while and navigated to the official website.
But I found there is nothing to afraid and found some good stuff. How many of you felt boring while repeatedly installing and formating to find a suitable distro. Live CD's reduces this problem to a great extend. But now this problem is greatly dealt by Pendrives (Memory stick). Demo Linux is specially built linux distro to be alive!. That means there is no need of a hard disk at all. A 32MB of RAM is enough to work with it. Hope it will be useful for those people who loves to be small.
Also read about Puppy Linux Slax and Kolibri
Subscribe to:
Posts (Atom)