Saturday, November 27, 2010

Just bought an Arduino, What's next?


This article briefly explain what is to be done just after purchasing an Arduino board. Even though the prerequisites of Arduino is less compared to other development boards, I think this article will be useful because Arduino is being popular among beginners. This article deals with the latest version of Arduino at the time of writing - it is Arduino UNO.
Setting up drivers
Connect Arduino to your computer via USB cable. It will power up from USB power. Now start Arduino IDE. If you have not Arduino IDE download from here. No need to install the software. Just extract using your favourite decompressing utility (my favourite is 7zip) and run the executable named 'Arduino'. Now you have to set up your IDE to work with your Arduino UNO. First select your hardware from Tools -> Board -> Arduino UNO (or your exact hardware name. If it is not listed, try to download the latest version). Next, select your serial port from Tools -> Serial Port. Selecting serial port is in different way different OS.
Linux
If the 'Serial Port' menu is not active, probably, your device is not connected properly. Try to reconnect. If more than one serial ports are shown in the menu, we need to find out which is the correct one. To do that, disconnect your arduino first. Then you probably need to restart the IDE. Then look at the 'Serial Port' menu and note down the listed COM ports. Then reconnect your device and track the newcomer. This is the easy way. Select it.
One of the problem I suffered while playing with arduino in my Ubuntu 10.04 LTS was that, the compilation of the program was a failure. It was a dependancy problem. So what I did is that, installed Arduino IDE as described here. But it was an older version and my device UNO is not listed in it. Then downloaded the newer version from the downloads page. That was really a tricky step!
MS Windows
In Windows, just after connecting your device to the PC, a device driver wizard appears and try to find the appropriate device driver for the device. It will take a while and at the end of the fight, it fails to find an appropriate driver. Close the wizard and go to 'Device Manger' (Either via Control Panel or by right clicking 'My Computer' then 'Manage'). Then you can find Aduino UNO as the unknown device. Right click on that and choose the option to manually install the driver. Then locate the directory where you have installed Arduino IDE. Then the system install the appropriate driver and now you can see your device on the list named 'Ports' in the Device Manger. In parenthesis, there will be the curresponding COM port number (eg: COM 4) . Then choose that COM port in the Arduino IDE.
Starting with 'Hello World'
The commonly accepted 'Hello World' in embedded devices is LED blinking. There is an example in the IDE itself. Open the file from File -> Examples -> Basics -> Blink
Look at the program. For an average C programmer, the program seems self-explanatory. To compile your program, choose Sketch -> verify/compile. Then to upload the executable to your device, choose,File -> upload to I/O board. If everything you have done is correct, you will get your Arduino programmed and starts working just after burning the program using the USB power. Disconnect it from USB and use in your standalone applications.
Read more..
Arduino Lanugage reference
Arduino Playground

Sunday, November 14, 2010

SMS email alert in mobile phone

One of the major disadvantage while handling e-mail services is that we need to check mails by intervals. Most people checks their account more than once a day. Some people start up their computer to only check the e-mail and finds that 'No e-mail today' and continue their frustrating work after a couple of hours. This type of services are 'pull-email' type services. Conversely, there's a 'push e-mail' service which will send the mail to your mobile devices. But this service is not available in all mobile phones or services. So here is a method which can be used virtually in any mobile phone. This service will alert you whenever you get a new mail with some information about the sender. The alert is done by sending an SMS. Unfortunately, this method can only be applied in INDIA. Sometimes, all mails receiving in your mailbox including spam may not be important to alert. So by setting up your gmail, you can select which type of mails should be alerted.
I assume you have a gmail account. If not, either you can make a new gmail account or a similar approach will work on your other accounts also- explore it. Moreover, you need to have an account in way2sms.com . Register on way2sms (The service of way2sms is currently limited to India only). You will get your own free email address in way2sms domain.
Setup in gmail account
Go Settings->Filters
Click 'Create a new filter'. Then a box will appear which shows that which type of mails are to be forwarded to way2sms.com. For example, if you type user@gmail.com in the 'from line-box', all mails from user@gmail.com will be filtered. There are several other options also. You can test your filter by clicking 'Test Search'.
Click 'Next Step' button. Then a new box will appear. Check 'Forward it to' option and enter your way2sms email address.
Click 'Create Filter'.
Now onwards, all your filtered mails will be sent to your way2sms email.
Set up in way2sms account
Log in to your way2sms account.
Click 'Mail Alerts' link in the top right corner of the page. Here you can activate mail alerts for 14 days. After 14days, it will be automatically deactivated. So it is needed to activate the alerts in every two weeks. You can deactivate it at any time.
Done. Now you will get an alert SMS whenever you receive a new e-mail.

Sunday, November 7, 2010

Set up Toshiba L650 laptops after ubuntu installation

This article explains how to set up device drivers after installing Ubuntu in Toshiba laptops. Most probably Ubuntu will not support LAN, WiFi, Bluetooth and in some systems, anomaly in working of fan, battery are reported. Some of my problems like LAN setup, WiFi and Bluetooth have overridden and my battery is still showing some problems. I hope these instructions will be helpful for Toshiba Laptop users. Note that this article is a "how I did" type article rather than a "how to".
Some models of Toshiba Satellite are preloaded with Windows and some are not. In pre-installed models, try to make the system dual boot. There are a lot of tutorials for that and in Ubuntu, this is pretty easy compared to other distros. Anyway, I assume you have Toshiba system with a fresh Ubuntu installed. I used Ubuntu 10.04 LTS on by Toshiba L650-i5310.
Setting up Ethernet
My ethernet card was from Atheros Communications. A driver for Atheros is available from http://linuxwireless.org/download/compat-wireless-2.6 . Download and unzip the file. Then in terminal, cd into that folder. Then type the following code:
scripts/driver-select atheros
make
sudo make install

Then reboot the system.
Setting up Wireless
My Wireless LAN card was from Broadcom Corporation. The driver is readily available from ubuntu repository.
sudo apt-get install bcmwl-kernel-source
echo wl | sudo tee -a /etc/modules

Reboot the system.
Setting up Bluetooth
In bluetooth, I did nothing in Ubuntu and I installed a bluetooth driver from Toshiba in Windows 7. After that incident, my Ubuntu also start detecting bluetooth adapter and don't know how this happened.

Saturday, September 18, 2010

How to run custom scripts at Linux startup?

It is a good idea to make your own scripts at the Linux start up. Here I am explaining the things with a simple example. I want to make a directory in desktop named 'folder' in each start up. If it is deleted, a new 'folder' is created in the same place in the next start up. Here is what I did.
first make a new script- here 'my_own_script'. Open the file in gedit and add the following:
#! /bin/bash
# chkconfig: 345 40 60
mkdir /home/tom/Desktop/folder
You need to change to the correct path in 3rd line. Here 345 means different run levels and 40 and 60 are the order for start and stop. save the file in /etc/init.d .
Then open terminal and execute this command:
chkconfig --level 345 my_own_script on
Then restart you computer and you can see a directory named 'folder' on your desktop in each start up. For more details, use:
man chkconfig
The mkdir command can be replaced by your own custom scripts. This worked on my PC powered with fedora 12. I found in linux forums that, it will work on Redhat/CentOS/Mandriva.
Start up programs are sometimes irritating and delay start up. So if you want to turn off your script from next start up, use command:
chkconfig --level 345 my_own_script off

Thursday, September 9, 2010

Indian languages support and software tools

Indian Govt. have an official website for Indian language support. You can download language support and software tools from this website or order for a free CD. The major tools are:
  1. True type fonts with keyboard driver
  2. Multifont keyborad engine for the true type fonts
  3. Unicode complient fonts
  4. BHARATEEYA Open Source
  5. Language OCR
  6. Language spell checker
  7. Bilingual dictionary
  8. Font design tool
  9. Transliteration tool
  10. Language text editor
  11. Tutor package
  12. Text to speech system
  13. Database sorting tool
  14. Number to word tool
  15. Typing tutor
  16. Language suppoted microsoft excel
  17. Type assistant
The CD is released by Ministry of Communications and Information Technology, Government of India. Contibuters are, C-DAC, Cyber space multimedia Ltd.,C K Technologies, Cadgraf Digitals System Ltd., Cyber Thomson, IMRC.
Click here to visit Technology Development for Indian Languages(TDIL).

Monday, August 30, 2010

Reveal Them! A Qt entertainment

I do some Qt exercise when I get leisure time. RevealThem is just the after effect but I hope source code will be useful for somebody. While I was over consuming my vacation in front of TV, found a nice program like RevealThem. Hiding a celebrity behind a brick wall, and player can remove bricks one at a time so that, a part of the face is visible. People get higher points if they identify the celebrity with minimum number of picks. I found it was interesting to realize in Qt.
How to use the software?
Step1: Download the program(Go to end of this post)
Step2: Download some pictures of celebrities in .jpg format and save it in images/ directory in the directory where the program is installed.
Step3: Open the executable and click 'Load Image'. then you can pick bricks by clicking on it and select correct answer from the list and click 'Check' button. For each pick you, lose your 10 points.
Step4: This program is just for fun only.

Download source code (Tested in both Linux and Windows - 3.27KB)
Download Windows binary (5.03MB)

Saturday, August 28, 2010

Qt Programming in Malayalam Part-1


Qt Programming in Malayalam is quite easy. Most of the strings used in Qt is of type QString. QString support all kind of unicode standards. So one can include mathematica and technical symbols, and non-English characters. Malayalam characters are also included in unicode. So usage of Malayalam in Qt is possible almost anywhere in Qt software designing. There are three major standards for unicode- UTF8-8bit, UTF-16-16bit, UTF-32-32bit. QString supports all standards and there's a bunch of translating functions to and fro for transforming QString to other types such as const char*.

You can transform simple programs in Qt to Malayalam with a little care. But still there may be problems while playing with non-English languages. Like other GUI's Qt is also limited in support to non-English languages, but still it is translatable.
Download this example (Windows binary - 4.76MB)
Download the source code (Tested in both Linux and Windows - 3.27KB)

Also read  Qt Programming in Malayalam Part-2

Friday, August 27, 2010

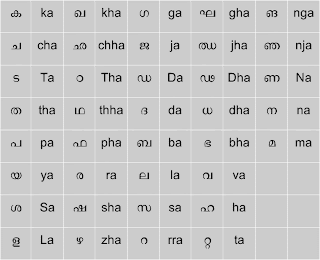
Malayalam for Windows

*Note: The above information is adapted from the resources of http://malayalam.web4all.in
The information in this post is specific to Malayalam users in Kerala, India. Other readers may not find anything useful in this post
"I need to do some work in Malayalam in Windows XP. What should I need to do?''
My post here tries to find the answer for the above question. Malayalam implementation can be done in two ways.
1)In-script keyboard - Each corrector in Malayalam is assigned to the key layout in the US keyboard. It become easier only after some practice2)Transliteration - This is easier method for beginners. In this method, you just type a word similar to the Malayalam word. (For example അമ്മ in Malayalam can be printed on screen by typing 'amma' in English.

Setting up Windows XP for In-script keyboard
Step1: Go to Control Panel->Regional and Language Options
Click on 'Language' tab
Step2: Check whether the check-box corresponding to "Install files for complex script and right to left languages(including Thai).
If not check it. If it is already checked, go to Step5.Step3: Then Computer ask your Windows CD for further installation of fonts. Then put your CD on the drive and click OK. Wait until complete installation. Then reboot your system after closing all dialog boxes.
Step4: Again do Step1 and this time the check-box will be checked.
Step5: Click 'Details' button. Then click 'Add' on the new dialog box. Choose Malayalam(India) and click OK.
Step6: Close all dialog boxes. In your task bar, you can see the current layout as 'EN" by default. Click on it and choose Malayalam from the list. Then 'EN' is changed to 'MY'. Now Malayalam keyboard is activated. and you can start type in Malayalam.
Open Wordpad (or any other text editor) from Start menu and start typing in Malayalam.

Setting up Windows XP for Transliteration
Step1: Download Mozhi Keyman from this link. Install it.
Step2: Just after installation, Mozhi Keyman icon will be visible on your task bar. Click on it and choose 'Mozhi Keymap' from the following list and you are done.
Open a text editor- I recommend Wordpad and type 'amma' and press enter. You can see the difference now.

You will get more information and support from
http://smc.org.in
http://malayalam.web4all.in

Sunday, July 4, 2010

mcu8051 IDE for Windows

mcu8051IDE can now be used in Microsoft Windows also. If you are not aware of mcu8051IDE, read my previous post: Introduction to mcu8051IDE

Download the following:
First install ActiveTcl and SDCC and then mcu8051IDE.
Then you have just completed mcu8051IDE installation in windows.
If you want to report bug, go here.

How to activate BSNL 3G in iPhone?

Maintaining iPhone features in India is not easy because almost all mobile phone users are belong to Nokia or Sony Ericsson. So support for Apple iPhone is less. To use BSNL 3G features, you require a 3G supported mobile phone and BSNL 3G USIM. Normally to get activated in BSNL 3G, you need to send {your mobile model} to 58355:

example: NOKIA E65
to 58355

It worked for my Nokia E65. But for iPhone it is currently not possible because, they are not having the settings for Apple iPhone. I activated 3G successfully and I did what follows.

Step1: Go Settings->General->Network->Cellular Data Network
Step2: Edit under the tab - Cellular Data
APN => bsnlnet
Usename => {Left blank}
Password => {Left blank}
Step3: Go Settings->General->Network
Step4: Switch 'Enable 3G' to ON. Also switch 'Cellular Data' to ON if not.

*Note: 3G will work if you are in a 3G coverage. Else you can get connected and use internet with 2G or 2.5G. If you are not in a 3G coverage area, it is better to turn off 3G. This will save a lot of battery. If you are in a 3G coverage, and you turned on 3G on your iPhone, a '3G' symbol will be displayed on top left corner of your iPhone screen. If you are in 2G, a 'E' symbol is displayed to remind that you are in EDGE network.

Step5: You are done. Use 'Safari' to browse internet.

If you are having any problem please report. If you found any other methods, please comment about it.

Sunday, April 11, 2010

Qt - Ping Pong Example


This is a simple ping pong (not game) play area example in Qt. You can modify this program to make your own arkanoid/ping pong games. I think it is useful for somebody. All files associated with the program with source can be downloaded. If you are Qt beginner like me, this example will help you how to use QTimer class and time interrupts.

Download ArkanoidArea

Saturday, March 27, 2010

FEL: Qucs tutorial for beginners Part1


Qucs- Quite Universal Circuit Simulator - is now as the name suggests, quite universal. Pspice, Tina Pro etc give a very fine experience for circuit designers. But as far as a student is concerned, buying them seems difficult. Even though SPICE and its open source derivatives were free to download, their user interface was diffcult to be handled by a beginner. In such cases, people go for a demo version. But some people need freedom to do anything and Qucs is intended for such people.
Qucs is opensource an run on both Linux and Windows platforms. Most probably, you can find the binary in your OS repo while a readily installable file is available for Windows users.
After successful installation, launch qucs from menu or entering command 'qucs' and hitting enter. A window similar to figure shown will appear with a plane work space. Click components and add std. compnents to workspace by drag and drop. You can change the component parameter by double clicking on the component. A label should be added to the workspace to indicate that which simulation you are doing. For a beginner, it is easy to learn simulation in Qucs after watching this video: Qucs.ogv

Download Qucs video tutorial : Qucs.ogv

Download Qucs sources.

Download Qucs for Windows
Note: You need FreeHDL to be installed along with Qucs in order to simulate digital circuits properly. It will be installed automatically if you install it from repo. If not, you should manually download and install and reinstall Qucs if necessary.

Monday, March 22, 2010

FEL: Introduction to MCU8051IDE


There is a lot of free and propitiatory IDEs for micro controllers. Here I like to write about MCU 8051 IDE - An open source project packaged under FEL (Fedora Electronic Lab). Intel 8051 is a standard micro controller and that's why it is essential in engineering syllabus even though some good stuffs are there in newer micro controllers from Microchip, Atmel etc. Simulating 8051 is pretty easy if you own a good 8051 IDE. There is a lot of IDEs available for 8051 simulation and emulation. But it is not a good idea to spent your valuable money for that, if such good free and open source IDEs are available. I am just coming to my point. It is about MCU 8051 IDE. It is packaged with fedora electronic lab. If you intend to stick with other OS, you need to compile the source code. Currently it supports more than 79 MCUs. Know more and how much powerful it is. I have uploaded a screencast of MCU 8051 IDE and I think it is enough to start with for a beginner who knows assembly level programming in 8051. Of course, one can write and simulate the program in C also.
Download video tutorial mcu8051.ogv.

You can view the screencast with VLC media player or any other ogv supported media player.

mcu8051IDE for Windows

Saturday, March 13, 2010

Inside the Mosquito killer


Nowadays, people widely uses mosquito killer bats because of their easy usage. The product is imported from China for very cheap price. There's some electronics inside it. If you understand the working principle of that circuit and if you are an owner of soldering iron, you can easily troubleshoot the problems and can use the product for a long time.
The power source of old products was dry cells, while now it is rechargable battery of 2.4V. There is bridge rectifier and a capacitor is used to get enough power to charge the battery. Transistor become ON, when switch is closed and the sudden change in current in the primary coil in the transformer forms a higher voltage. The voltage is coupled to the secondary coil. transformer winding is so that peak voltage will be about 2000V. The diode network only pass a fraction of the output voltage to the metal net.

Friday, March 12, 2010

Slider game using Qt


It is better to do simple things first in Qt before making hands dirty with complex programs. Now I just prepared a slider game using Qt.Hope all of you know how to play slider game. My code is simple and having a slider panel of 3x3 matrix. I know the code is not much pretty. But I just put my source code to download. It may be helpful for beginners. Of course, you can modify the code to satisfy your needs.
Enjoy!

Download slider.zip
Note: You need to recompile the code before using. I successfully compiled the code in Linux. Of course, you can compile it in other platforms without modification of code.

Monday, March 1, 2010

Welcome note on Puppy Linux boot up screen

Is it fun to display a welcome note with your name while booting up Puppy linux? If you think so, you can continue reading. Here I am telling how to set up your Puppy Linux to display "Welcome, {your name}" at boot up. Probably you can do this in other Linux based OS with slight or no modifications. But nowadays bulky operating system intentionally hide the boot up screen with a splash image.
First of all, navigate to /etc/rc.d
Then open 'rc.sysinit' . You should have root privileges in order to edit this file. Read carefully the 'Read me' file before going to do anything. If you are not going to take a risk, back up the file into any other externally accessible directory.
After you open the file in your favourite text editor, just go through the file, you will notice that, this script is automatically executed at every boot up. Go to the end of the file and append the following script.

##########CUSTOM SCRIPT##############
echo -n "

" >/dev/console
/bin/echo -e "\\033[10G\\033[1;34mWelcome, {Your name}\\033[0;39m" >/dev/console
echo -n "

" >/dev/console
sleep 2
###################################

Edit the script with your name instead of '{Your name}'. The script is nothing but an echo statement to the console. It is possible to change the display properties by changing the parameters along with the text. First test it in terminal and then write script is recommended. Now save the file and reboot.
Done.
If you avoid 'sleep 2' statement, you may not see the text at boot up. One best way is remove the line 'sleep 2' and set a login password for Puppy as I did. Then Puppy gives a cool welcome to you and then ask password.

Saturday, February 20, 2010

Free anonymous email now for security

If you want to register in a website which is untrusted and you are not intend to reveal your identity to them, but the website need your email ID and it is mandatory. What do you do? In such cases it is good idea is to have a temporary email which lives only for few days or months and will expire. But for some instant access, it is necessary. You are allowed to read incoming mails till the account expires.
Go here.
You just need to make your account by entering your user name. password is optional. you also need to specify the date which the account expires. Nothing more and you have done.

Sunday, February 14, 2010

Yo Frankie: Open Game Project from Blender

Do you remember Big Buck Bunny?

'Big Buck Bunny'(Code-named Peach)is a classical animated short film entirely from Blender platform which is open source. The video reveals the power of Blender of course, and also contains a neat story with full of fun. If you didn't see this short film yet, you are too late, but here is the chance to download. The hero in this film is a big Buck. Other characters are some naughty animals named Frank, Rinky and Gamera. I personally like Frank's acting than others. I think many people realize that secret, that is why the rise of new open game named Yofrankie (Code-named Apricot). The name came from Frank's name and hero is Mr. Frank. You need to download the game (~120MB) which will run on a Blender engine or Crystal space. Another good side of YoFrankie is that you can develop it in your way wince it is open source. A number of good tutorials are there published in the official website. Both Big Buck Bunny film and YoFrankie are released under Creative Commons Attribution License. Watch a video of Yofrankie below:

Wednesday, February 10, 2010

Let's have fun during festivals!

Festivals are not only for entertainment. You can do some cool things. I have just made a fire powered car using commonly available things during festivals. See how:

The things you required:Now, make the things done.
Unfortunately, I can't capture pictures and videos of running the car, because, my mobile phone did something wrong while capturing. Sorry. I don't have another sample to do once again. I will try it next year!

Car after launching.I got everything fine. Even though you think this type of stuffs are gibberish, people like me find entertainment by doing so.

Warning: use a metal or card board plate above toy car in order to avoid over burning. Don't do it in you room. Do it away from your home as well as from inflammable things. Don't launch while you stand behind the car.

Friday, February 5, 2010

Kolibri : Just 3MB size for this OS!


I am a fan of small operating systems, because, I really suffered the problems of bulky operating systems. I used puppy Linux (It's something great), Damn small Linux etc. Damn small Linux is only 50MB in size and works much fine. Some floppy Linux comes in 1.44MB but it has no GUI at all. A normal user need GUI with some office applications, media player, internet browser, email client, need some programming, and games. But all of the listed above is not included in the floppy linux at all, but almost all are covered by Puppy Linux and DSL. Average of 50MB is happy for me, but for some users, it is too high!. This is what the reason of development of ultra small OS with a size of only 3MB.
The 3MB sized OS is named 'Kolibri' which means humming bird- world's smallest bird. Kolibri is moderately fare OS for eyes with very high performance. In order to increase efficiency of code, OS itself is written is assembly language. I installed Kolibri in my pen drive. The boot up time is less than 3 seconds. I really shocked while seeing the stuff included in just a 3MB. About 30 classic games, text editor, image viewer, text based internet browser, hex editor, assembler,music player, of course a shell and many more. kolibri argues that, it is not windows, linux or anything. It's shell which can accept only 20 commands. But I found all are linux/unix cmmands. There is a bunch of 3D demoes which are excellent.
Go to Kolibri official wesite.
How to install?
You can download iso image and write it to a CD. But I felt ashamed to write 3MB sized iso image to CD. So I opted my pen drive. Installed it using windows XP. It can be installed using linux also. Download image for floppy/hardware first and unzip it. You probably need 7zip for that. Then copy Kolibri.img into thumb drive. Before copy, you need to fromat your thumb drive/pen drive to FAT32. After copying, go to HD_load->USB_Boot directory and run inst.exe then, run setmbr.exe. You need to reboot now and boot from usb. If you don't know how to boot from usb port, you need to read my old post: Booting from CR-ROM or USB devices
Sometimes, you need bulk operating systems to get your job properly done. But this type of efforts of developers seems really appreciable.

Saturday, January 16, 2010

Swathanthra Malayalm Computing

Note:- Malayalam is the mother tongue of Kerala (India). I don't know people other than keralites interested in it.

I will be a little verbose, if I am telling about my childhood and my mother tongue - Malayalam. It intrude in my words, however I try to hide that. Everything I first heared in Malayalam - stories, poems everything and of course, I first read the Holy Bible in Malayalam. Now what about Malayalm computing?? Now the Open source community offers "Swathanthra Malayalam Computing" for Linux Systems. Just see the Ubuntu malayalam desktop below(this picture is not captured by me. Thanks to http://arunmvishnu.com/).Visit official website of SMC.
You can turn your desktop into full fledged Malyalam desktop if you follow the instructions in the official page. I am not intended to copy the same instructions in the official page.But the following links will be useful:
  • If you can't read anything from SMC, your browser probably haven't the malayalam font installed. I purposefully doesn't added any malayalam words in this post in order to clearly read those who haven't their firefox installed with malayalam plug in. Today onwards, you can easily read any malayalm websites on your firefox. Here is the solution.
  • Mozhi:You can write malyalam articles of your own using Varamozhi. I personally felt a little difficulty in writing malayalam in Mozhi compared to blogger. But Mozhi offers a unique english character bunch to represent a malayalam letter.
  • A guide for malayalam in computer.
  • Download Debian Lenny in malayalam.
  • Have a look at Wikipedia in malayalam.
Some malayalm blogs:
http://berlytharangal.com/
http://karinkallu.blogspot.com/
http://workersforum.blogspot.com/
http://vellezhuthth.blogspot.com/
http://rajvengara.blogspot.com/
http://marjaaran.blogspot.com/
This is a small list and you can see several hundreds  of Malayalam blogs by searching with a keyword something like 'malayalam blogs list' or in this link.

Tuesday, January 12, 2010

Here comes Octave Online


Before going to read more check whether you know about Octave.

From the inspiration of my last post about the online Python, I searched internet for the online octave. Luckily, it was a success. All scripting languages or tools are feasible to convert to its online version, even though it doesn't exist for the most. Come back to Octave online. I don't know whether it can be called as octave online, but they calls it Math calculator which supports octave. I was successful in executing simple matrix calculations in the Octave online. Anyway, it is the time to dive into Octave online. You just need to click here.
The parent website http://www.online-utility.org/ offers other free online utilities. Search and explore more.

Online Python

My friends always complaint that they don't have an environment for learning python. They have internet connectivity in the college, but not having the permission to install python interpreter on those machines. So they satisfied by just reading the tutorial only and not by doing python. But here is the solution. Online Python Interpreter is an online python terminal and you can enter python commands as like in your shell. The virtual browser shell is a little bit slower and and again slower for slower internet connections. The speed is entirely depend upon your internet connection and no way to increase because entire python engine is on the server side. But I am sure it will be a boon for the beginners and net-book users. Current limitations are:
  • Can't define functions or classes.
  • Can't run a script

Click to enter online python interpreter
Click to view the ubuntu forum discussion about online python interpreter

Wednesday, January 6, 2010

Let's make our hands dirty with PIC

This is my first cook book on beginner level PIC programing. This book is useful for the very beginners who don't know how to develop in PIC programming. I included a screen cast video to learn the entire tutorial within minutes. The book format is available in both pdf and doc format. Of course, everything is free and distributed under Creative Common's License. All codes under GPL. I am thankful if you suggest any improvement and point out any errors. Nothing more to say.

Download Introduction to PIC Micro (9MB)

View the tutorial video: (It is included in the download package)

Saturday, January 2, 2010

How to hack passwords in windows XP?

Warning!
Things here explained can be used in extremely nasty things. They are not recommended by Opentechlab. Use everything in your own risk. Also Opentechlab suggest some tips to avoid password hacking.

Here I am going to say something cumbersome to somebody. Here is a guide to hack the login passwords in windows XP. Also given how to avoid such hacking and keep your PC maximum protected from crackers. Opentechlab does not crack, it will hack only!

Password hacking using Backtrack
You first download the following file

Backtrack 3 Final (BT4 is also available, but I suggest BT3)

BT3 is an opensource Linux OS. BT3 consists of just a slax and the hacking and network security software. Since Slax uses lzm module mechanism, it is easy to install and remove the modules we need to. You ca download it as a bootable iso image or as USB pen drive installation file. I downloaded iso and write it to a CD and everything going perfect. Once you installed BT3, you just need to boot up from CD-ROM. Within minutes, linux kernel loads and backtrack desktop appears. Now you need to do the following things:

bkhive /mnt/hda1/WINDOWS/system32/config/SYSTEM key

(result is the boot key)

samdump2 /mnt/hda1/WINDOWS/system32/config/SAM key
samdump2 /mnt/hda1/WINDOWS/system32/config/SAM key >~/Desktop/password.txt
john ~/Desktop/password.txt -users=Administrator

now the hashed password will be showing below

Here, it is assumed that hda1 is C: drive (where MS windows XP is intalled). If not, that should be repaced with the actual one. The password.txt is file which contain passwords of all users, but they are no readable, they are hashed. To remove hash, you need to call a program called john.
john ~/Desktop/password.txt -users=Administrator
only gives the password of Administrator. If you want to know the password of another user, type:
john ~/Desktop/password.txt -users=username
You can simply do this:
john ~/Desktop/password.txt
to get passwords of all users, but it is time consuming. Knowing what you want is ponentially advantageus than knowing everything. And it will not eat much of your time. Somethimes if the password to be hacked is much complex, you get a leisure time to drink a cup of coffee!

How to use rainbow tables in backtrack?
You can use rainbow tables while hacking passwords. You can download lot of rainbow tables from freerainbowtables. I think downloading all rainbow tables in your hard disk is frustrainting (more than 1000GB!). Download some simple tables to experiment with. To use rainbow tables, BT3 provides a program called 'rainbowcrack'. It can be accessed from:
Main menu -> Backtrack -> privilege escalation ->All -> Rainbow crack
But rainbow crack only supports tables of type *.rt. But rainbow tables with type *.rti is abundant over internet to free download. Solution is to download *.rti tables and conver it to *.rt using rti2rto.exe. Here you are able to use rainbow crack instead of john. All other steps are same.

Using Ophcrack
Ophcrack is also opensource and is also useful. I personally didn't tried that, however many of my friends work successfully with that.

Download Ophcrack
You need to download rainbow tables also.
Read more about rainbow tables

How to prevent password hacking?
Here again, prevention is better than cure. If you care about how much your data secure to be, you should keep your passwords be secure first. First of all, you do not store your passwords anywhere other than your brain. Every time you enter your passwords at login, is boring, but you should aware of the consequences. I said it generally, but here this is not possible. Use more than 10 characters for your password. For each addition of a new character, you can see that how much extra time BT3 takes to find out the password. Add symbolic characters and numbers. Finding a password with symbolic characters and numbers are very frustrating, and a cracker work hard for hours on such computer until he get a message 'Failed to find password'. Don't enter a password with meaningful words. If your password is a sentence such as 'Mary had a little lamb' and others password is 'asdfiuerh', then it is very easy to find out the former even though it is lengthy in character. Use different passwords for diffenrnt internet accounts. If you feel difficulty to memorise all passwords, you requre a good password manager (I recommend Keepass). Change your passwords periodically. It will save you a lot. If you have a top secret information, and is not to be revealed to the world for any reason, I have a good idea but is not guaranteed. Just copy the thing to any portable device and put it in a Bank locker and through your computer to fire and keep watching until it get into ashes.

Friday, January 1, 2010

PYRO : Python in hand with Robotics

Python developers all over the world are searching for fields that are not involved python. I recently found a good job by them - a boon for robotics enthusiasts - that is Python Robotics or simply Pyro.

Go to pyro project page

Download Pyro live CD

Many built-in python scripts are there to define the robotic brain and paths. Of course, you can write your own scripts. Anyway, pyro is a wonderful experience.

I encountered a problem while booting from pyro live CD. It seems to be mother board and chipset specific. My problem was, no x start up. It hangs up when displays "Probing/Loading AGP Modules...". I used several knoppix cheat codes to enter into kde desktop. It was successful. Thanks to knoppix developers forum. The boot time cheat code i entered is:

knoppix noagp

If you encounter any such problem, try to search for knoppix boot problems and not for pyro boot problems.