Monday, August 30, 2010

Reveal Them! A Qt entertainment

I do some Qt exercise when I get leisure time. RevealThem is just the after effect but I hope source code will be useful for somebody. While I was over consuming my vacation in front of TV, found a nice program like RevealThem. Hiding a celebrity behind a brick wall, and player can remove bricks one at a time so that, a part of the face is visible. People get higher points if they identify the celebrity with minimum number of picks. I found it was interesting to realize in Qt.
How to use the software?
Step1: Download the program(Go to end of this post)
Step2: Download some pictures of celebrities in .jpg format and save it in images/ directory in the directory where the program is installed.
Step3: Open the executable and click 'Load Image'. then you can pick bricks by clicking on it and select correct answer from the list and click 'Check' button. For each pick you, lose your 10 points.
Step4: This program is just for fun only.

Download source code (Tested in both Linux and Windows - 3.27KB)
Download Windows binary (5.03MB)

Saturday, August 28, 2010

Qt Programming in Malayalam Part-1


Qt Programming in Malayalam is quite easy. Most of the strings used in Qt is of type QString. QString support all kind of unicode standards. So one can include mathematica and technical symbols, and non-English characters. Malayalam characters are also included in unicode. So usage of Malayalam in Qt is possible almost anywhere in Qt software designing. There are three major standards for unicode- UTF8-8bit, UTF-16-16bit, UTF-32-32bit. QString supports all standards and there's a bunch of translating functions to and fro for transforming QString to other types such as const char*.

You can transform simple programs in Qt to Malayalam with a little care. But still there may be problems while playing with non-English languages. Like other GUI's Qt is also limited in support to non-English languages, but still it is translatable.
Download this example (Windows binary - 4.76MB)
Download the source code (Tested in both Linux and Windows - 3.27KB)

Also read  Qt Programming in Malayalam Part-2

Friday, August 27, 2010

Malayalam for Windows

*Note: The above information is adapted from the resources of http://malayalam.web4all.in
The information in this post is specific to Malayalam users in Kerala, India. Other readers may not find anything useful in this post
"I need to do some work in Malayalam in Windows XP. What should I need to do?''
My post here tries to find the answer for the above question. Malayalam implementation can be done in two ways.
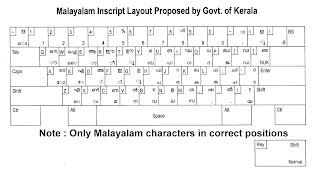
1)In-script keyboard - Each corrector in Malayalam is assigned to the key layout in the US keyboard. It become easier only after some practice2)Transliteration - This is easier method for beginners. In this method, you just type a word similar to the Malayalam word. (For example അമ്മ in Malayalam can be printed on screen by typing 'amma' in English.

Setting up Windows XP for In-script keyboard
Step1: Go to Control Panel->Regional and Language Options
Click on 'Language' tab
Step2: Check whether the check-box corresponding to "Install files for complex script and right to left languages(including Thai).
If not check it. If it is already checked, go to Step5.Step3: Then Computer ask your Windows CD for further installation of fonts. Then put your CD on the drive and click OK. Wait until complete installation. Then reboot your system after closing all dialog boxes.
Step4: Again do Step1 and this time the check-box will be checked.
Step5: Click 'Details' button. Then click 'Add' on the new dialog box. Choose Malayalam(India) and click OK.
Step6: Close all dialog boxes. In your task bar, you can see the current layout as 'EN" by default. Click on it and choose Malayalam from the list. Then 'EN' is changed to 'MY'. Now Malayalam keyboard is activated. and you can start type in Malayalam.
Open Wordpad (or any other text editor) from Start menu and start typing in Malayalam.

Setting up Windows XP for Transliteration
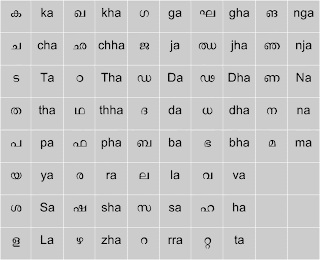
Step1: Download Mozhi Keyman from this link. Install it.
Step2: Just after installation, Mozhi Keyman icon will be visible on your task bar. Click on it and choose 'Mozhi Keymap' from the following list and you are done.
Open a text editor- I recommend Wordpad and type 'amma' and press enter. You can see the difference now.

You will get more information and support from
http://smc.org.in
http://malayalam.web4all.in

Sunday, July 4, 2010

mcu8051 IDE for Windows

mcu8051IDE can now be used in Microsoft Windows also. If you are not aware of mcu8051IDE, read my previous post: Introduction to mcu8051IDE

Download the following:
First install ActiveTcl and SDCC and then mcu8051IDE.
Then you have just completed mcu8051IDE installation in windows.
If you want to report bug, go here.

How to activate BSNL 3G in iPhone?

Maintaining iPhone features in India is not easy because almost all mobile phone users are belong to Nokia or Sony Ericsson. So support for Apple iPhone is less. To use BSNL 3G features, you require a 3G supported mobile phone and BSNL 3G USIM. Normally to get activated in BSNL 3G, you need to send {your mobile model} to 58355:

example: NOKIA E65
to 58355

It worked for my Nokia E65. But for iPhone it is currently not possible because, they are not having the settings for Apple iPhone. I activated 3G successfully and I did what follows.

Step1: Go Settings->General->Network->Cellular Data Network
Step2: Edit under the tab - Cellular Data
APN => bsnlnet
Usename => {Left blank}
Password => {Left blank}
Step3: Go Settings->General->Network
Step4: Switch 'Enable 3G' to ON. Also switch 'Cellular Data' to ON if not.

*Note: 3G will work if you are in a 3G coverage. Else you can get connected and use internet with 2G or 2.5G. If you are not in a 3G coverage area, it is better to turn off 3G. This will save a lot of battery. If you are in a 3G coverage, and you turned on 3G on your iPhone, a '3G' symbol will be displayed on top left corner of your iPhone screen. If you are in 2G, a 'E' symbol is displayed to remind that you are in EDGE network.

Step5: You are done. Use 'Safari' to browse internet.

If you are having any problem please report. If you found any other methods, please comment about it.

Sunday, April 11, 2010

Qt - Ping Pong Example


This is a simple ping pong (not game) play area example in Qt. You can modify this program to make your own arkanoid/ping pong games. I think it is useful for somebody. All files associated with the program with source can be downloaded. If you are Qt beginner like me, this example will help you how to use QTimer class and time interrupts.

Download ArkanoidArea

Saturday, March 27, 2010

FEL: Qucs tutorial for beginners Part1


Qucs- Quite Universal Circuit Simulator - is now as the name suggests, quite universal. Pspice, Tina Pro etc give a very fine experience for circuit designers. But as far as a student is concerned, buying them seems difficult. Even though SPICE and its open source derivatives were free to download, their user interface was diffcult to be handled by a beginner. In such cases, people go for a demo version. But some people need freedom to do anything and Qucs is intended for such people.
Qucs is opensource an run on both Linux and Windows platforms. Most probably, you can find the binary in your OS repo while a readily installable file is available for Windows users.
After successful installation, launch qucs from menu or entering command 'qucs' and hitting enter. A window similar to figure shown will appear with a plane work space. Click components and add std. compnents to workspace by drag and drop. You can change the component parameter by double clicking on the component. A label should be added to the workspace to indicate that which simulation you are doing. For a beginner, it is easy to learn simulation in Qucs after watching this video: Qucs.ogv

Download Qucs video tutorial : Qucs.ogv

Download Qucs sources.

Download Qucs for Windows
Note: You need FreeHDL to be installed along with Qucs in order to simulate digital circuits properly. It will be installed automatically if you install it from repo. If not, you should manually download and install and reinstall Qucs if necessary.